Can You Upload Photos From External Harddrive
Apple's photo management software for the Mac, Photos, has grown to exist a fairly competent all-purpose storage locker. But as your photo and video library grows — and specially if yous've taken advantage of iCloud Photo Library — you may notice that your Photos library strains to fit on your Mac'due south hard drive.
While at that place are options to keep your Mac from running out of space, like optimizing your photo storage if y'all use iCloud Photo Library, information technology comes at a cost: Without a fully-stored Photos library, you lot won't be able to create secondary backups of your images and video. (And every bit good equally iCloud has become, your photos and video are precious plenty that they're worth keeping backed up in multiple places.)
There is an culling: Moving your Photos library to an external drive (or creating an entirely separate library and syncing it with iCloud). Hither's how to practise it, and some reasons why you should — and shouldn't! — consider it for your needs.
- Why you should (and shouldn't) utilize an external drive with Photos for Mac
- Best external drives for storing photos
- How to move your current Photos library to an external drive
- How to create a new Photos library on your external drive
Why you should (and shouldn't) use an external drive with Photos for Mac
There are a number of reasons why an external drive might brand sense when y'all're working with Photos for Mac:
- You have a giant Photos library (and, if you use iCloud Photo Library, you want to ensure you have a secondary fill-in of everything in that library)
- You frequently swap computers and want to work on your images from any Mac
- Your library isn't huge, but y'all'd prefer to save space on your Mac for other files
- You lot share a computer with other users and you have limited drive infinite
- If y'all're working with space constraints on your primary figurer, it'south one of the easiest ways to back up your full iCloud Photo Library
That said, there are some downsides, also. Here are some reasons you might non want to utilise an external bulldoze:
- You don't accept a big plenty library to warrant moving it off your Mac
- Y'all don't desire to take to worry about ever having your external drive connected to view and edit your images
- You use a laptop frequently and can't afford an SSD, and yous don't want to risk breaking your disc-based hard bulldoze past constantly moving information technology
- Y'all don't want to accidentally create duplicate libraries that can't exist continued to iCloud Photo Library (considering your offsite library is continued)
- Unless you purchase a speedy drive, working externally is near always slower than working on your default hard drive
- Yous don't want to spend the coin on an external drive
- If you use an automated backup service for your computer, you'll take to set up a second gear up of rules for backing upward your difficult drive
Best external drives for storing photos
Okay, so you've decided to movement your Photos library over to an external drive. What side by side? If you already have an external drive, y'all can always use information technology for storing your Photos library (and salvage on cash). But if you're considering getting a new drive for this endeavour, here'south what I suggest:
- Get a drive that's at least ane-2TB in infinite, preferably 4TB. With the iPhone able to relieve 4K video, our infinite needs aren't shrinking anytime presently: The bigger difficult bulldoze you can afford, the better.
- If you're buying a stationary hard bulldoze, buying a disc-based hard drive is great, but buy good brands — don't try and save $50 on an off-brand difficult bulldoze. It's rarely worth the HDD failure.
- If you're ownership a portable hard bulldoze, consider SSD: Information technology's very pricey in comparing to a disc-based drive, but if you know you'll be frequently moving around — particularly if y'all plan to move around with the drive connected — y'all want a bulldoze that can take a picayune rumble and tumble without skipping or failing.
- Hard drive speeds are of import, likewise: The faster a drive'south write speed, the quicker your images volition re-create; the faster a drive'southward read speed, the easier information technology volition exist for yous to view images or video and edit them, likewise.
Want some recommendations for specific external hard drives? We've got those, likewise.
- Best USB-C Hard Drives for Mac
- Best External Hard Drives for Mac
- Best Daze-Resistant Hard Drives for Mac
How to move your current Photos library to an external bulldoze and employ it as your master library
Every bit with creating a new library, moving your library to your external drive is a multi-step process. Hither'due south how to get about it.
Stride 1: Re-create over your Photos library
- Connect an external drive to your Mac via USB, USB-C, or Thunderbolt.
- Open a new Finder window.
- Open up your external drive in that window.
-
Open up a new Finder window. Don't close your previous window (open to your external drive), as yous'll need it shortly.
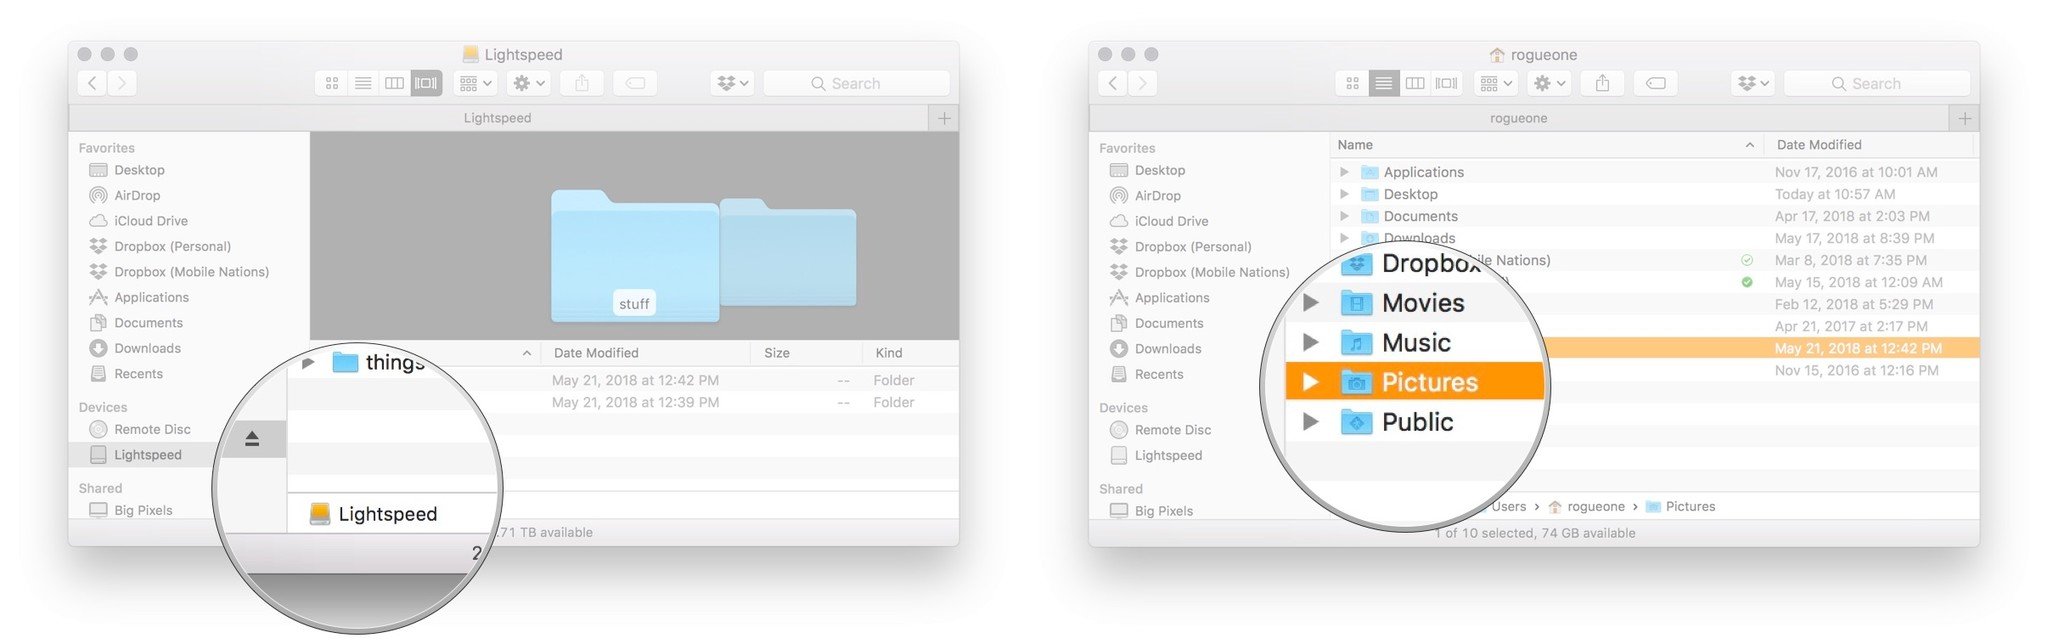
- Click the Get carte and navigate to your Home folder.
- Select the Pictures folder.
- Select your quondam library.
-
Drag information technology to your external drive in the other Finder window.
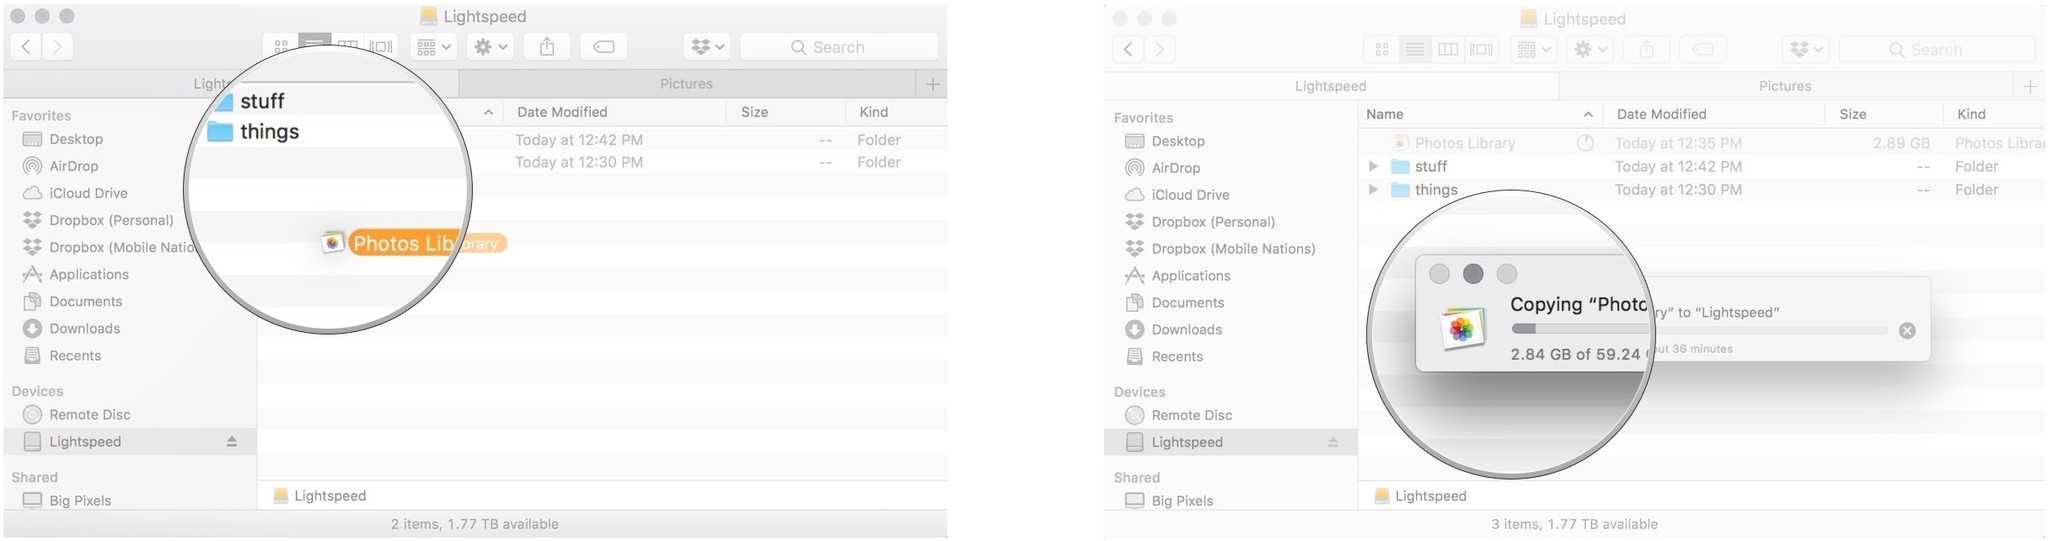


Your library will begin to copy over to your external drive. Depending on the size of your library and speed of your drive, this can have anywhere from a few minutes to several hours, and then be patient. Don't unplug your drive or turn off your computer during this process.
Step 2 (if you utilise iCloud): Turn off iCloud sync on your old library
Earlier yous open your copied Photos library on the external drive, you have to disassociate the library on your Mac from iCloud. (If you don't use iCloud Photo Library, you tin can skip these steps.)
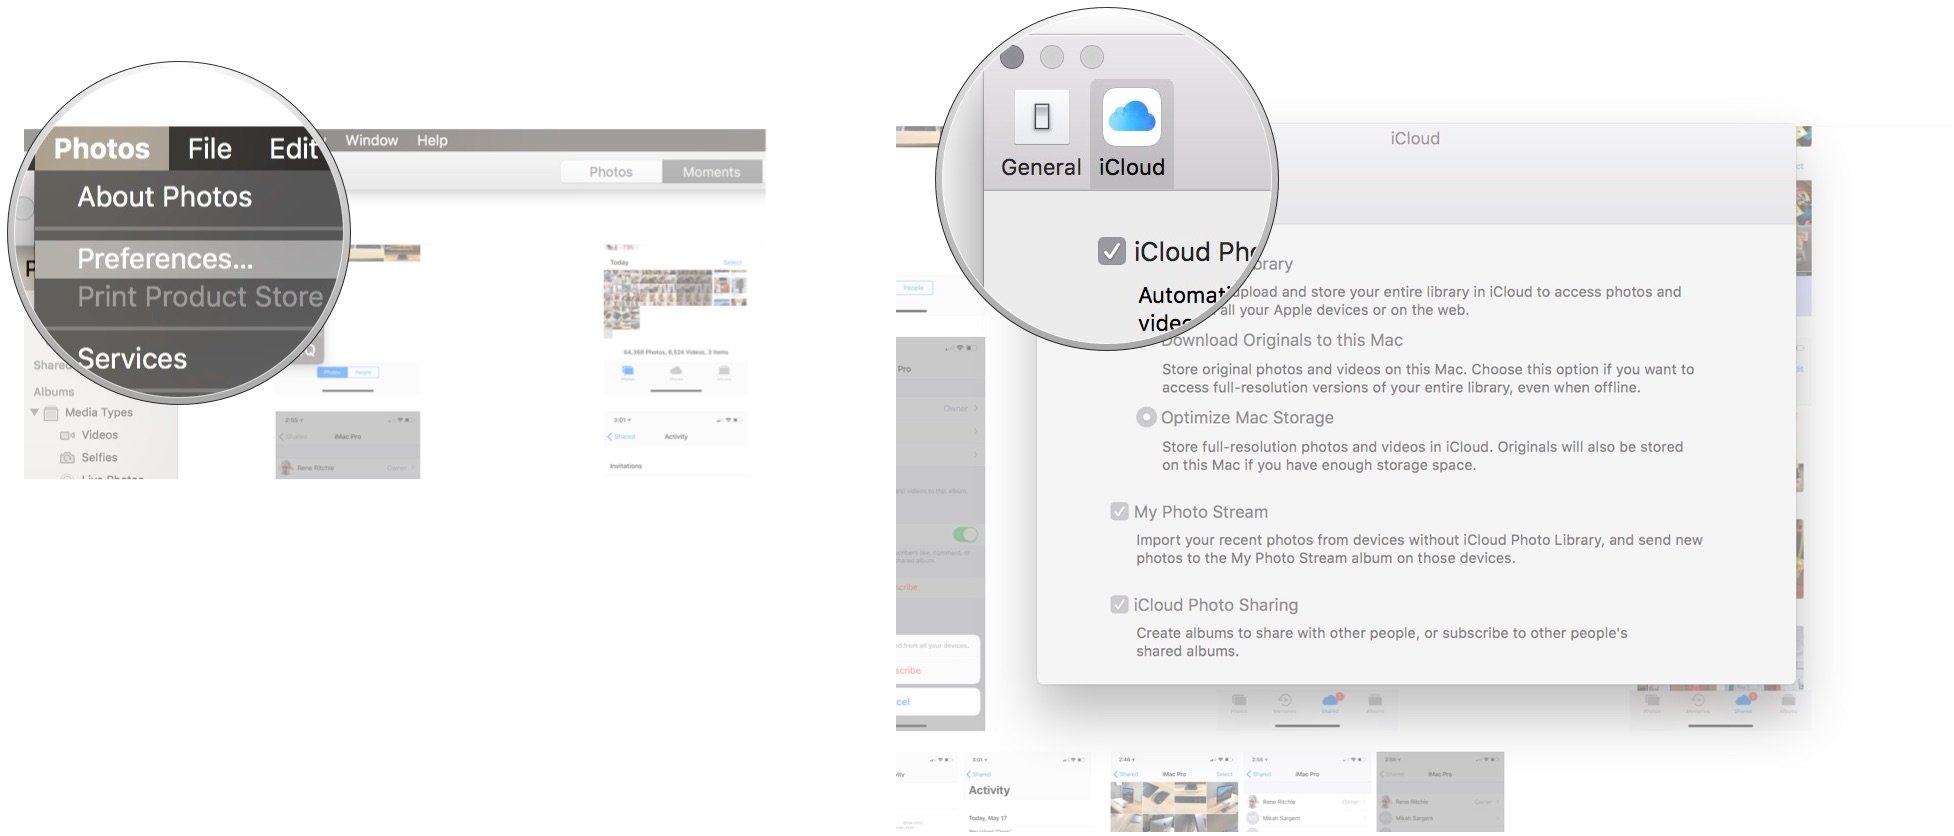
- Open Photos on your Mac.
- Go to the Photos menu.
- Select Preferences.
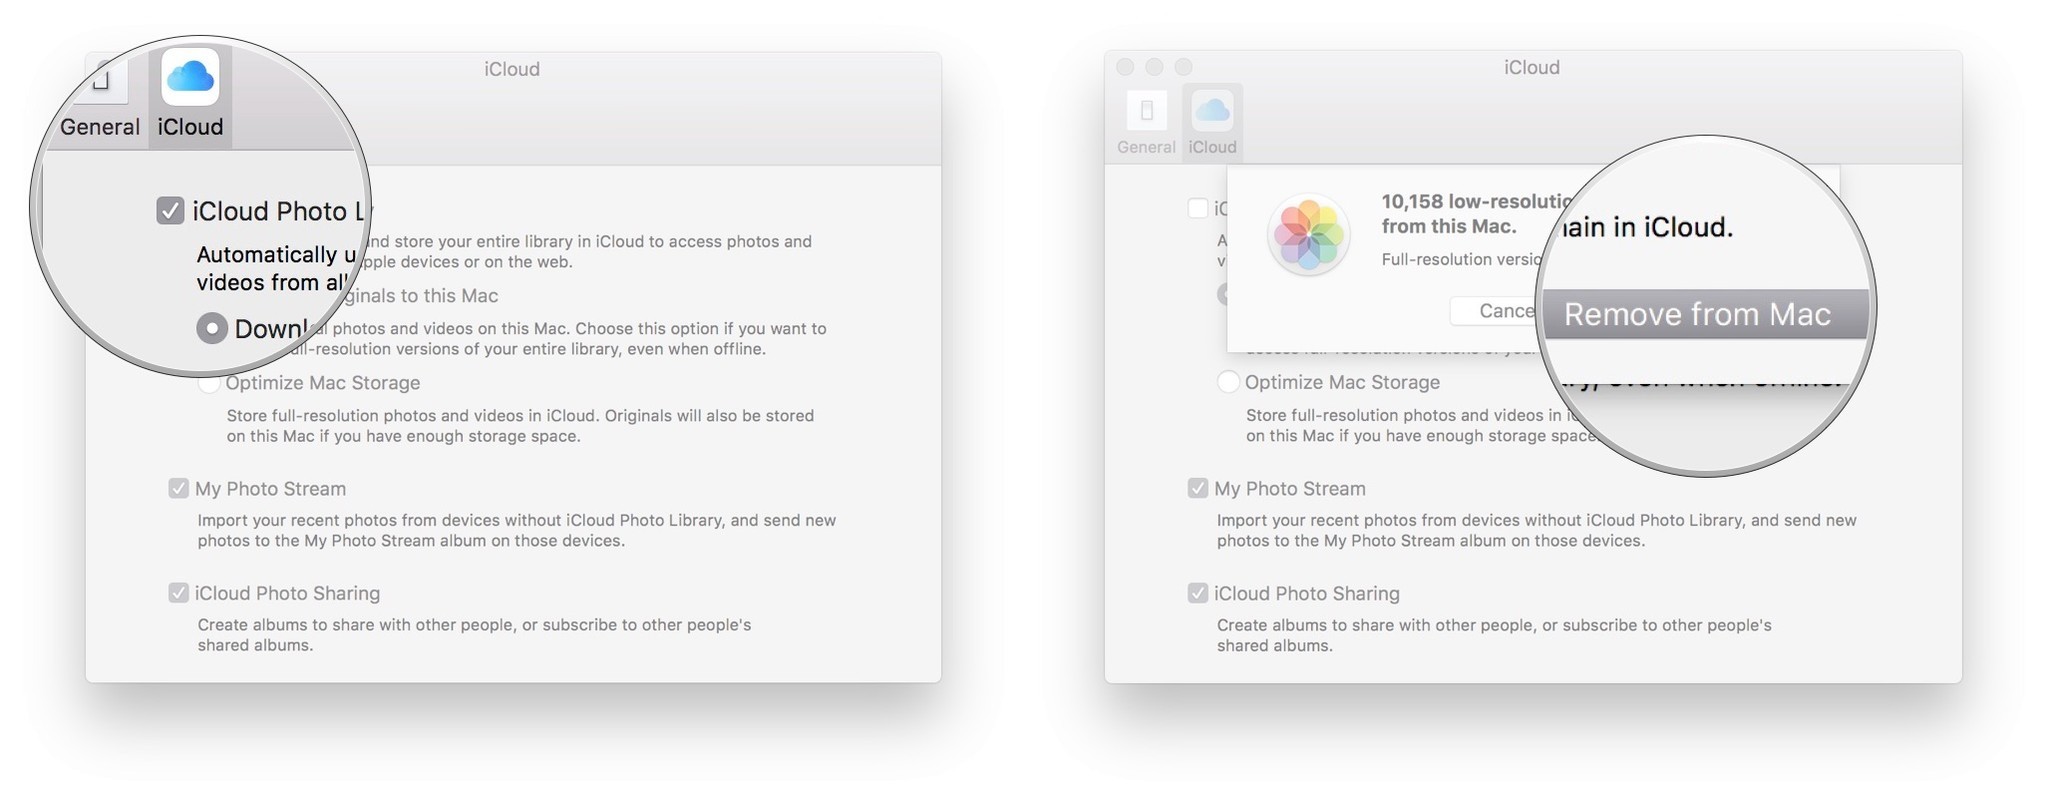
- Click on the iCloud tab.
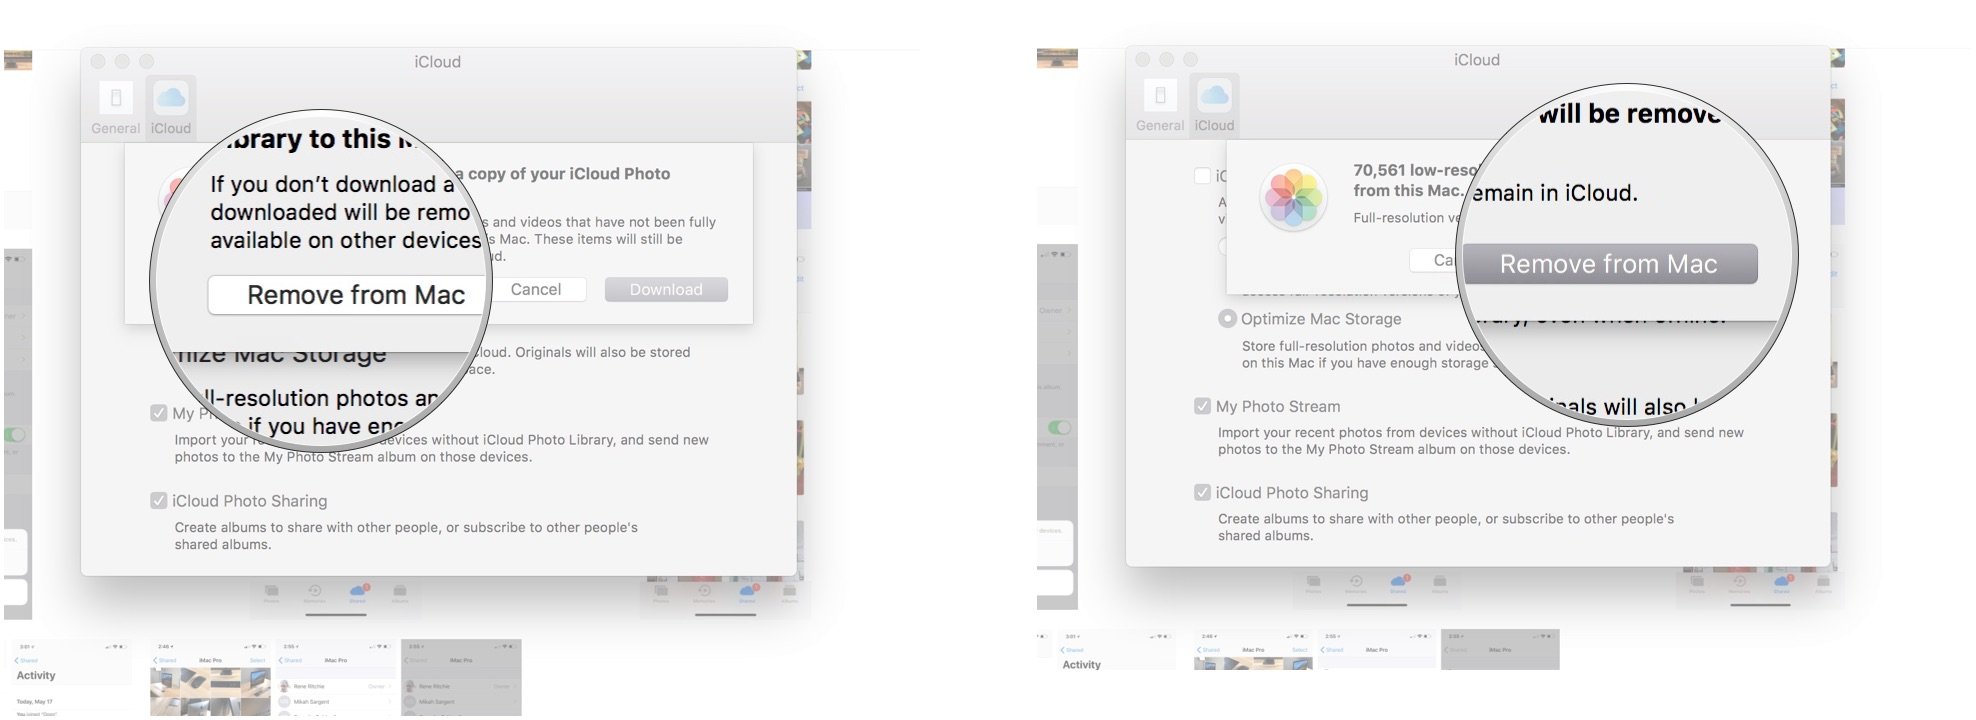
-
Uncheck iCloud Photo Library.
- Press Remove from Mac to remove whatsoever undownloaded low-resolution items from this library.
-
Quit Photos.


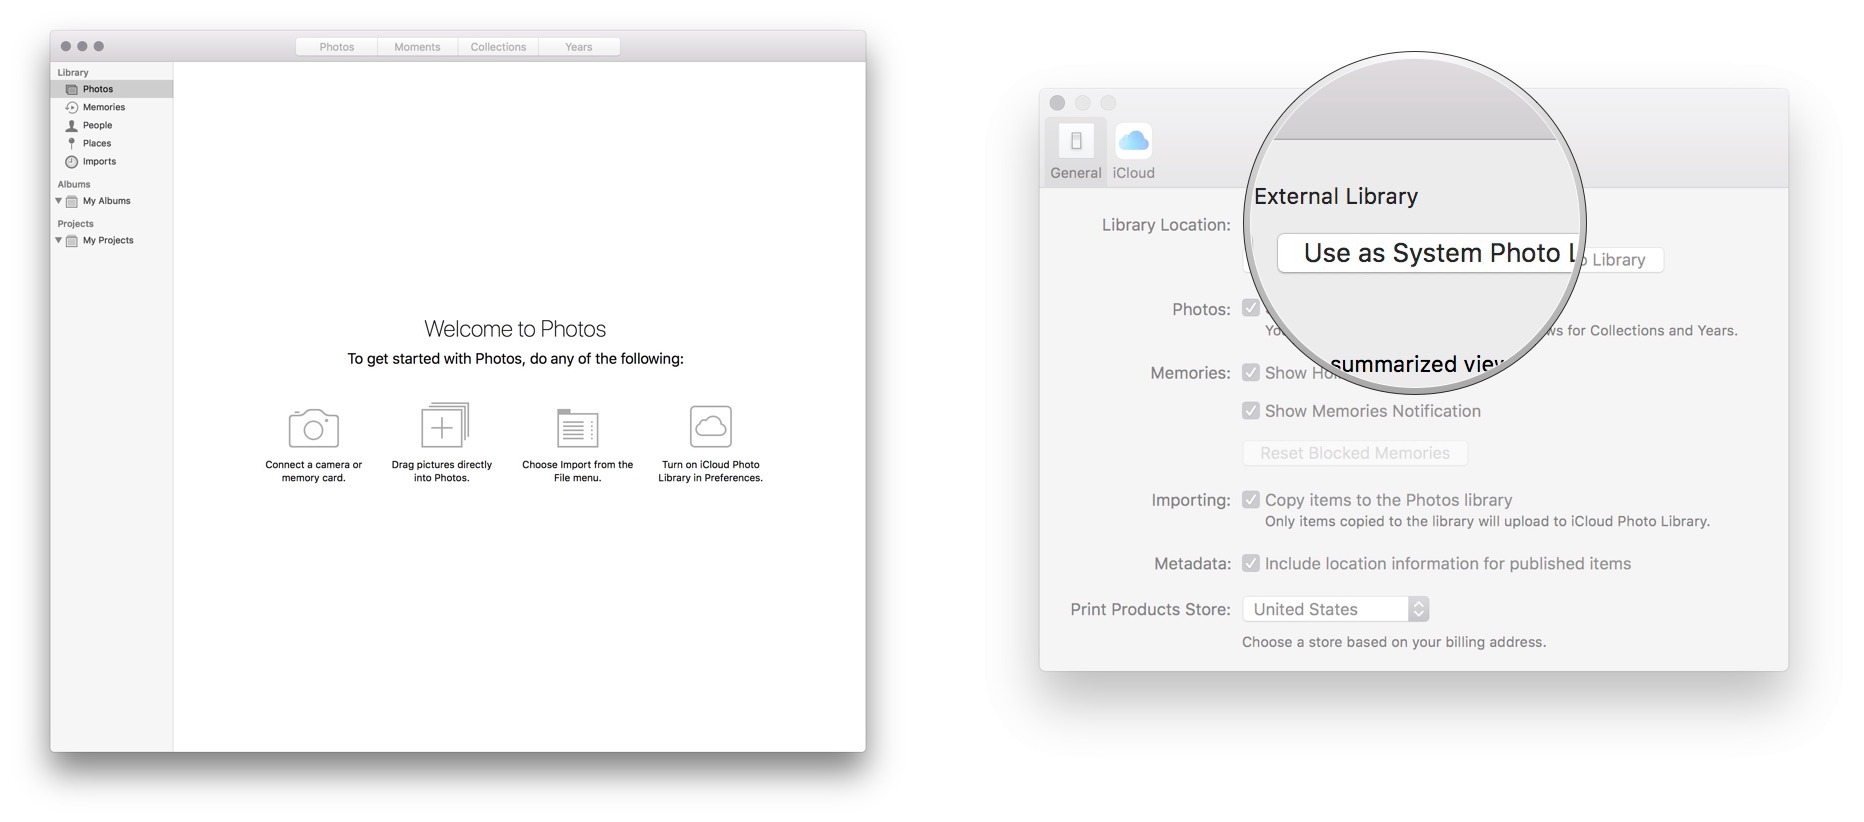
Stride iii: Brand your new library your arrangement default
Now, it'due south time to brand your newly-copied Photos library your system default.
- Open Photos on your Mac.
- Go to the Photos carte du jour.
- Select Preferences.
-
Click Employ as System Photo Library.

Stride 4 (if you use iCloud): Connect your new library to iCloud
Your external library is now set up to exist your system default, but information technology's non currently connected to iCloud. If you use iCloud Photograph Library and want to keep that connection agile so that you can continually download items yous've stored, read on. (Otherwise, you can skip this step.)
- Open up Photos on your Mac.
- Get to the Photos carte.
- Select Preferences.
-
Click on the iCloud tab.
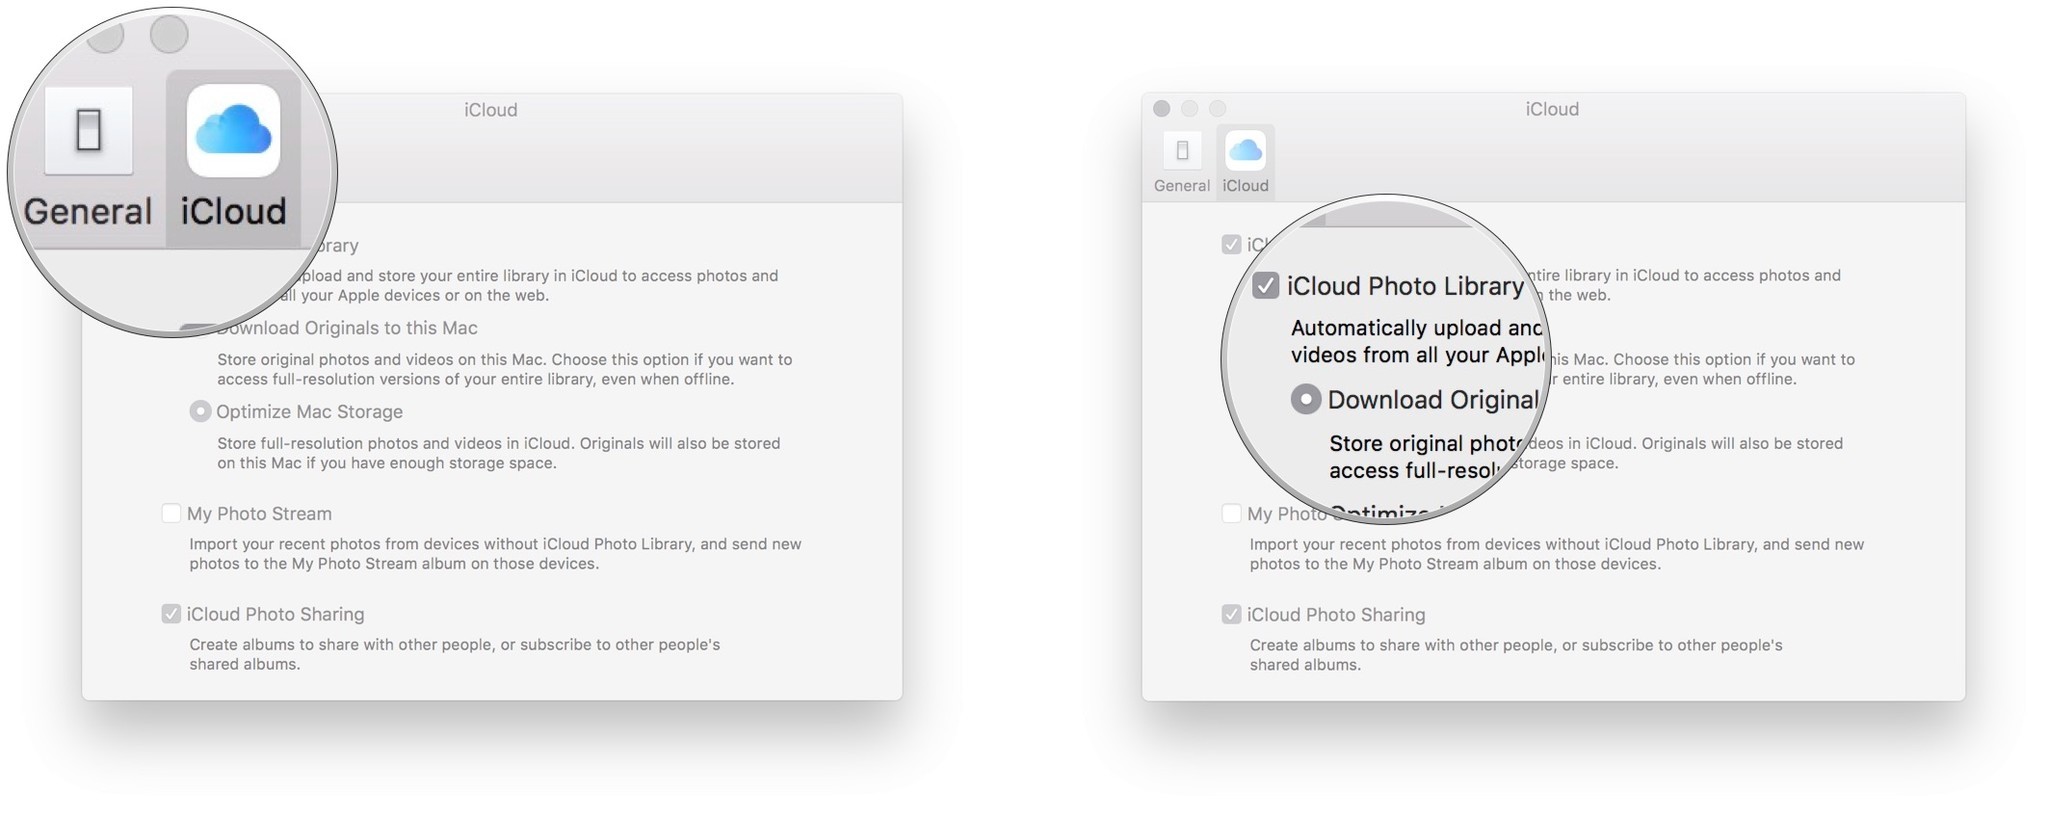
- Check iCloud Photo Library.
- Click Download Originals to this Mac.
- Wait for your Mac to download your images from iCloud. (Depending on the size of your iCloud library and your cyberspace connection, this may take up to 24 hours; don't disconnect your external bulldoze or turn off your Mac during this time.)

Once your library has fully synced and downloaded images, you tin can disconnect your bulldoze; whenever you want to use your Photos library, yous now need to connect your drive to your Mac.
Footstep 5: Go rid of your old library
A personal plea: Please, delight, please make sure your library is fully copied and working on your external bulldoze earlier you follow the steps below — once yous've thrown away your original library, it's gone!
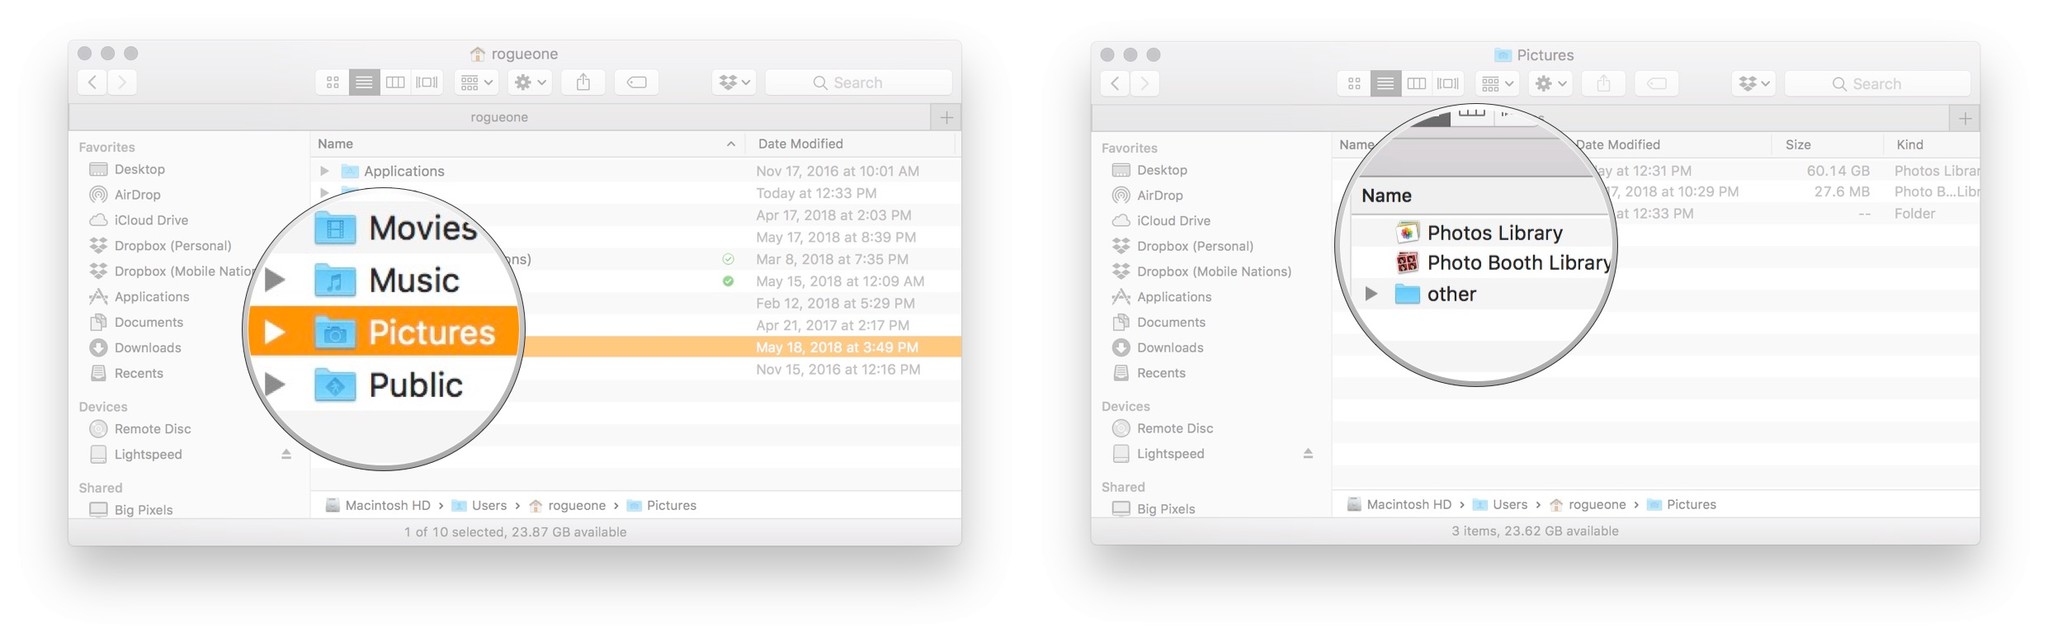
- Open a new Finder window.
- Click the Go menu and navigate to your Dwelling house folder.
- Select the Pictures folder.
-
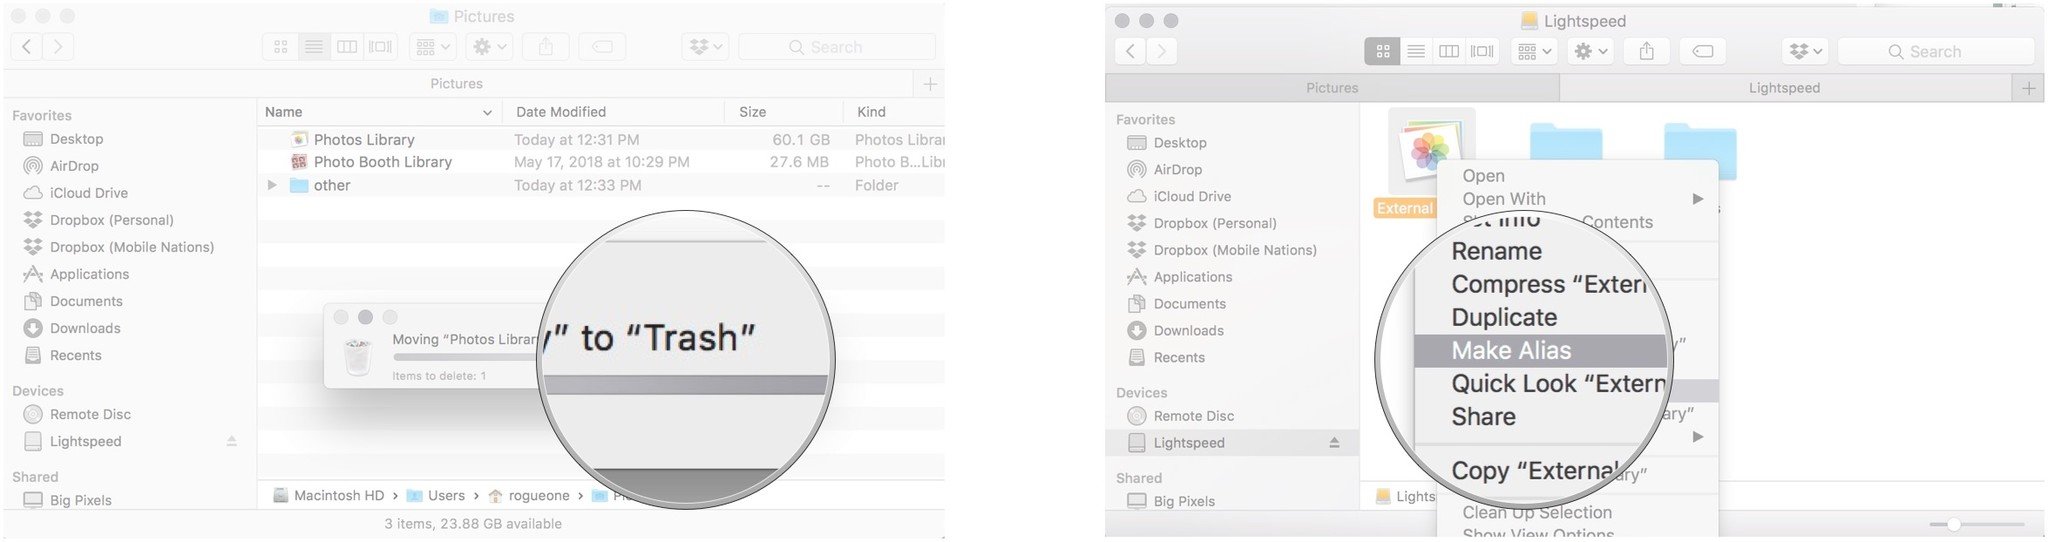
Select your former library.
- Drag it to the Trash (or press Command-Delete on your keyboard).
- Empty the Trash.
- Open a new Finder window. Don't close your previous window (open to the Pictures folder), every bit you'll need information technology later.
- Select your external drive.
- Right-click (or control-click) on your copied Photos library on your external drive.
- Select Brand Alias.
- Drag the alias to the Pictures folder.
-
Rename the allonym to remove the "allonym" function of its proper noun.


Now you have a direct link to your copied Photos library from the Pictures binder: This prevents your computer from accidentally creating multiple Photos libraries in case you forget to launch Photos with your external drive connected.
Note: If you're worried about accidentally creating libraries, you can ever launch Photos by option-clicking on its icon in the Dock or Applications binder; this will requite you the option of picking which library you'd like to launch.
How to create a new Photos library on your external drive and use it as your main library
Creating a new library on your external drive is a multi-step process. Here'south how to go about it.
Stride 1 (if yous use iCloud): Turn off iCloud sync on your old library
Before y'all create a new Photos library, y'all have to disassociate your current library as your organization default. (If you don't use iCloud Photograph Library, you lot can skip these steps.)
- Open Photos on your Mac.
- Go to the Photos menu.
- Select Preferences.
-
Click on the iCloud tab.
- Uncheck iCloud Photo Library.
- Press Remove from Mac to remove all depression-resolution items from this library.
- Press Remove from Mac again to ostend.
-
Quit Photos.

Pace two: Create your new Photos library
Once you've done this, it'southward time to create a new library.
- Connect an external bulldoze to your Mac via USB, USB-C, or Thunderbolt.
- Option-click (and continue holding down option) when launching the Photos app on your Mac.
- When it asks you lot to choose a library, click on Create New….
-
Name your library.
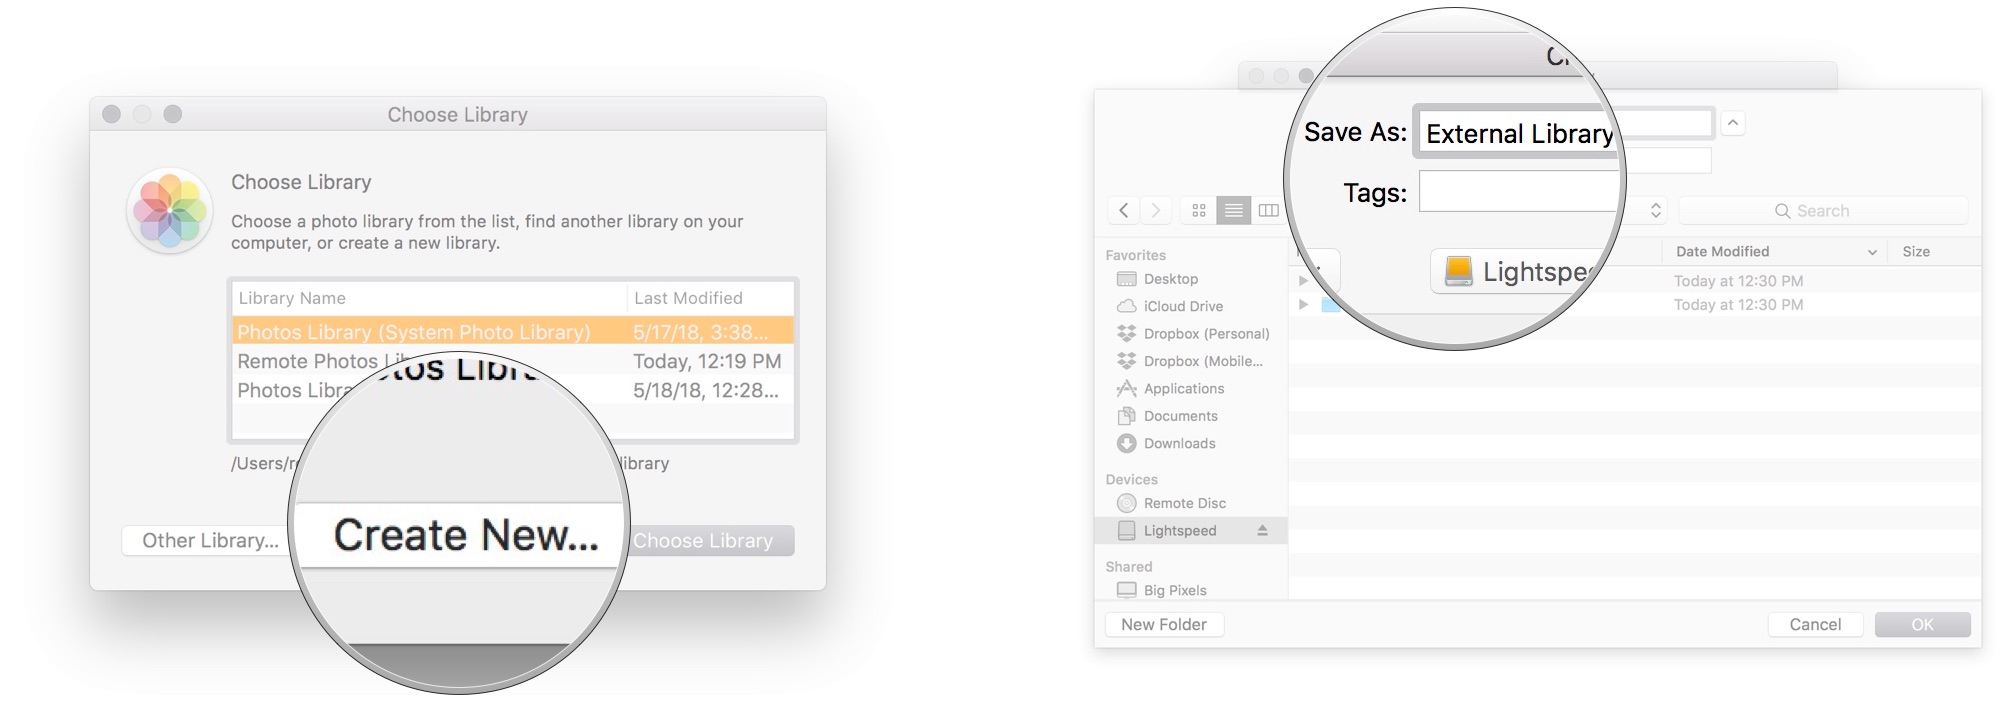
- Printing the Downward arrow to expand the File picker and choose your external drive as the new location.
- Press OK to save it to your external drive.

Stride iii: Brand your new library your system default
You'll now take an empty library on your external drive. Side by side up: Making information technology your arrangement library.
- Open Photos on your Mac.
- Go to the Photos carte du jour.
- Select Preferences.
-
Click Use as System Photo Library.
Step iv (if you lot use iCloud): Connect your new library to iCloud
Your external library has now been prepare upwards from scratch. If you apply iCloud Photo Library and want to download all the items you lot've stored at that place to take an external fill-in, read on. (Otherwise, yous tin skip this step.)
- Open Photos on your Mac.
- Become to the Photos carte.
- Select Preferences.
-
Click on the iCloud tab.
- Check iCloud Photo Library.
- Click Download Originals to this Mac.
- Look for your Mac to download your images from iCloud. (Depending on the size of your library and your net connexion, this may take up to 24 hours; don't disconnect your external drive or plough off your Mac during this fourth dimension.)
Once your library has fully synced and downloaded images, y'all can disconnect your bulldoze; whenever you want to apply your Photos library, you now need to connect your bulldoze to your Mac.
Step v: Go rid of your old library
A personal plea: Please, please, delight make sure your new library is live and working on your external bulldoze before you follow the steps beneath — once you've thrown away your original library, it'southward gone!
- Open a new Finder window.
- Click the Go menu and navigate to your Home folder.
- Select the Pictures binder.
-
Select your old library.
- Drag it to the Trash (or press Command-Delete on your keyboard).
- Empty the Trash.
- Open a new Finder window. Don't close your previous window (open to the Pictures binder), as yous'll need it later.
- Select your external drive.
- Right-click (or control-click) on your new Photos library.
-
Select Brand Alias.
- Drag the alias to the Pictures binder.
- Rename the alias to remove the "alias" function of its name.
Now you have a direct link to your Photos library from the Pictures folder: This prevents your computer from accidentally creating multiple Photos libraries in case you forget to launch Photos with your external drive connected.
Note: If you're worried nearly accidentally creating libraries, you tin ever launch Photos by option-clicking on its icon in the Dock or Applications folder; this will give yous the option of picking which library you'd like to launch.
Questions?
Let usa know in the comments.
Updated March 2019: Updated for macOS Mojave.
Serenity Caldwell contributed to an earlier version of this postal service.
solorzanojoyinewerhat.blogspot.com
Source: https://www.imore.com/how-use-photos-mac-external-hard-drive
Postar um comentário for "Can You Upload Photos From External Harddrive"